Self
Help Chinese Calligraphy Video Tutorial
A
division of educational resources of www.art-virtue.com.
Updated: 09/30/2016
Preface
This video tutorial is designed to guide beginners to learn the basics of Chinese calligraphy. Whether you know Chinese or not, learning Chinese calligraphy can be fun and inspiring. Anyone who is interested in this art can start learning by finding a good teacher or following the instructions in each lesson here. For those who don’t speak Chinese, a basic understanding of Chinese language and culture is recommended. We may learn the Chinese language and brush calligraphy at the same time, just as the way the Chinese kids were taught in the ancient times.
Learning Chinese calligraphy can be started at any age if we know the right methods. Adults and kids can both make astonishing progress if we can apply the correct methods - it does not matter when we actually started. One of my most skillful calligraphy teachers actually started after age thirty! What matters more is how well we understand the basic principles and apply them carefully. Besides, we have lots of time in our life to learn over and over again. In fact, some masters of Chinese calligraphy and brush painting actually started later in their life.
|
Please note that due to camera angles, the brush does not seem to be perpendicular to the paper in some of the video clips. The whole brush and its hairs should be kept perpendicular to the paper all the time. This is a very important rule for beginners. |
Paper, brush, ink stick, and ink stone are the “Four Treasures of A Study ( 文房四寶 ).”
Watercolor brushes and Indian ink sold in many American art stores won't be suitable for Chinese calligraphy. To obtain maximum progress, try to use ink and paper rather than water and Chinese calligraphy magic paper because writing with ground ink and water are totally different things. To purchase Four Treasures, you may visit www.amazon.com, http://stores.ebay.com/Big-Teapot-Brush-Jade-Dress-eStore/ or www.orientalartsupply.com/.
|
|
|
|
|
|
Shuan Paper or Xuan Paper ( 宣紙 ) is the best paper for Chinese calligraphy. Rice paper is a misnomer used in the West since Shuan Paper contains no ingredient of rice. Many brands of "rice paper" sold from Western art stores are not actually Shuan Paper or the so-called rice paper. They are usually Cotton Paper "Mien Paper ( 棉紙 )" in long rolls which is also not made of cotton. By using the misnomer "rice paper" will most likely mislead most beginners in selecting the various kinds of Chinese calligraphy and painting paper used for many different purposes and effects.
It’s sort of expensive for beginners to practice on Shuan Paper. Mao Bien Paper ( 毛邊紙 , Bamboo Paper ) is a cheaper substitute for practice. It's strongly recommended not to use newspapers to practice Chinese calligraphy. As newspaper is free and full of distractions, we may not want to focus and our progress will be limited.
Mao Bien Paper is usually categorized into two types: the Nine-Palace Grids (Nine Chequers, 九宮格 ) and the Rice-Character Grids ( 米字格 ). Each type helps beginners to position the strokes for the structure of a Chinese character. It is also a misnomer to call Chinese characters "symbols." Chinese characters are made of strokes, section headings, and radicals. Section headings and radicals are also two different concepts; yet they are often mistranslated and confused by most people and in the West. Chinese characters are not letters or alphabets. (Eventually, we will have to practice on paper without grids as we become more familiar with the positions of strokes.)
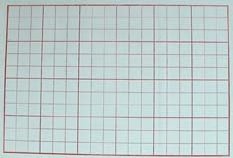
A. Nine-Palace
Grids |
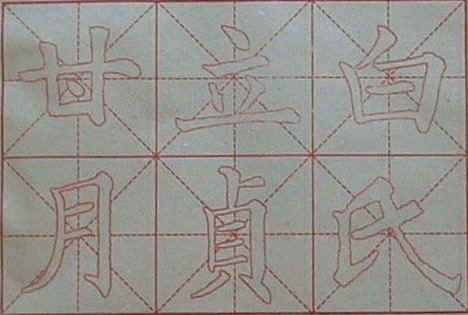
B. Rice-Character Grids |
You may get practice sheets from www.acornplanet.com/books.shtml or local Chinese bookstores.
If we get practice sheets like above right picture (B.) with the traced characters, we may not need a Model Book ( 字帖 ) at this moment. All we need to do is fill in the strokes carefully by following the basic rules of strokes. The strokes are executed without amending any unsatisfactory strokes or details to make them look better. Amending or retouching ( 描 ) is considered a "failure" and "dishonest" in Chinese calligraphy. It’s forbidden for all students and calligraphers at all levels. In China and many other Asian countries, calligraphers, scholars, officers, emperors or presidents may lose trust to people if they are found to retouch their strokes in brush writing. (This rule does not apply to regular writing using pen or pencils.)
|
Incorrect ways of practicing Chinese calligraphy with retouches Once a Chinese calligraphy stroke is done, it cannot be amended, enhanced, or fixed. Unlike other visual art techniques, all Chinese calligraphy strokes are permanent and incorrigible, demanding careful planning and confident execution. Chinese place a strict rule on brush writing as it should come directly from one's mind and real skill. If an officer in China is found with retouching a stroke in brush writing (not pen writing), he will be ridiculed and disrespected! All Chinese parents and teachers insist that every student to make a fine brushstroke in one single movement. A retouched brushstroke can be easily told by many people since it shows evidences of inconsistent ink densities. This is very different from painting, Western calligraphy, or other forms of arts.
|
You may buy a brush (mao bi, 毛筆) in local Chinese bookstores or online. Choosing a brush is the most critical point of doing good Chinese calligraphy. A lot of brushes on the market, especially those not made specifically for Chinese calligraphy, may not conform to the requirements in practicing Chinese calligraphy. If we do not pick up a good brush, we might get frustrated and give up very, very soon because we cannot produce satisfactory strokes even if we are very gifted. Some details and characteristics of brushes are explained in P1: Selecting, Preparing, and Maintaining A Brush.
We have to use the ink ( 墨 ) made specifically for Chinese calligraphy. Other ink such as Indian ink, colors, or paint won’t do. Traditionally people grind an ink stick ( 墨條 ) on the ink stone ( 硯臺 ). This is absolutely an indispensable step to master the Art of Chinese Calligraphy.
Using bottled ink or liquid ink ( 墨汁 ) may hinder brush motions to certain extent because it does not contain all natural ingredients as in an ink stick. The preservatives in bottled ink will affect the quality and life of brush hairs to some extent. Formal Chinese calligraphy works written with some inferior or even famous brands of bottled ink will cause the ink smear during the processes of mounting the calligraphy in scroll form. Most people today use bottled ink to save the labor and time. Grinding an ink stick on the ink stone ( 研墨 or 磨墨 ) may be time consuming for today's beginners; however, it produces shades of beauty and increases the dexterity and strength of hands and wrists. We may adopt a compromising way by mixing a little water with bottled ink together on the ink stone. Then press and move the ink stick in a circular motion clockwise on the ink stone a few times, say, for a couple of minutes. This may save our time and also will preserve some advantages of using the "all natural" ink sticks. The secret to produce good ink in a shorter time is to press the ink stick hard downward and gently rotate in a circular motion.
|
Correct way of using an ink stick Use clean water and rotate the ink stick in circular motions. We may rotate from the wrist or shoulder to exercise those joints. This is a good preparation for operating a brush.
|
|
Incorrect way of using an ink stick Do not tilt the ink stick as shown. Do not rotate the ink stick in a non-continuous motion. These might strain our muscles if done improperly for a long time. Never splash ink on the ink stone. The ink falling on clothes and paper are permanent.
|
We also need a black or white mat (felt, usually made of wool) or some smooth and totally flat newspaper to prevent the ink from running through on the surface of the desk. The black felt is shown under the paper in the picture. The student has to be very careful to move the felt as he or she moves the writing sheet, otherwise the wet spots on the underside will make blotches on the calligraphy. We also have to make sure that the felt is wrinkle free so we can produce even and smooth strokes; otherwise, the stokes will be twisted, distorted, uneven, or even look disconnected. Many people have neglected these important points and have concluded that either they are not talented in doing smooth strokes, the brush quality is not good, or their hands are not steady.
There
are five major styles of Chinese calligraphy – Seal (Zuan or Zhuan), Clerical (Li),
Running (Tsao or Cao), Walking (Hsin), and Standard (Kai) Styles. Each major style has
numerous derivatives (sub-styles) by
different calligraphers and people throughout Chinese history. Choosing our first style will greatly influence our
thoughts, styles and our artistic accomplishment in the future. Choosing an improper style will confine
our progress and points of view.
Different calligraphy teachers have different assertions about choosing
the first style. Except for Running and Walking Styles, the other three styles can be
selected for beginners. (Running and Walking Styles both have many irregularities and demand a faster
speed during writing.)
The following charts and the first two videos of the Playlist list choices for beginner's first styles, their features and contributions to future progress if a beginner focuses on any one of them for a few years and then goes from there.
|
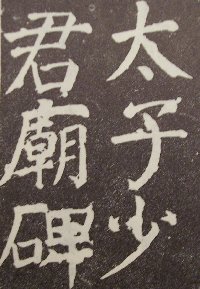
Standard
Style |
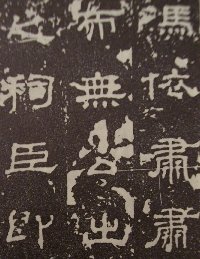
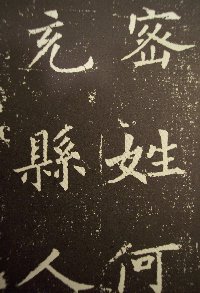
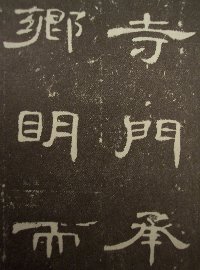
Clerical
Style |
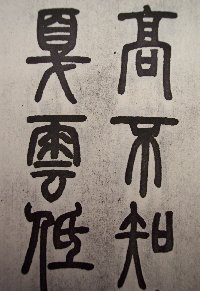
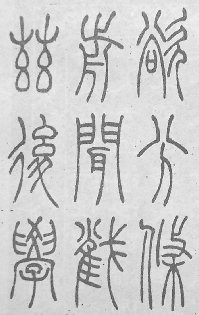
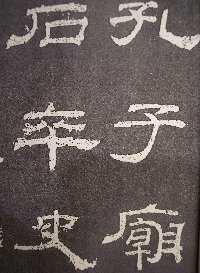
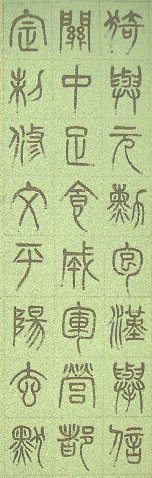
Seal
Style |
|
|
S A M P L E #1
|
始平公造像 |
|
|
|
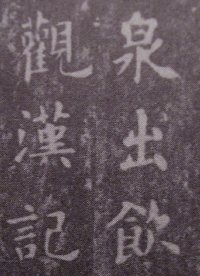
S A M P L E #2
|
九成宮醴泉銘 |
|
|
|
S A M P L E #3
|
|
|
|
|
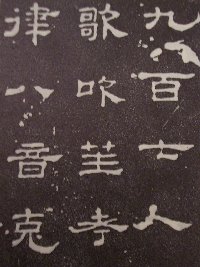
S A M P L E #4
|
颜真卿颜勤禮碑 |
|
|
|
Pros & Cons
|
Ad
1. Adopted by most new students as their first styles. |
·
1. Elegant beauty with varieties of character structures. |
·
1. Better understanding of Chinese character evolutions. |
|
Click on
|
|||
|
More samples: |
歐陽詢溫彥博碑 柳公權玄秘塔 張猛龍碑 隋人書妙法蓮花經 牛橛造像題記 魏靈藏像題記 孫秋生造像題記
|
孔宙碑 曹全碑 張遷碑 |
|
(Videos to be updated.)
Beginners may also refer to Free
Models for practice sheets. ( ![]() )
)
The Model Books ( 字帖 ) are the best lifetime teachers for learning Chinese calligraphy. Every ancient Chinese calligrapher went through a long process in their life emulating ( Lin Mo 臨摹 or Lin Te 臨帖 ) from Character Models or Model Books which are masterpieces of previous masters. The more we dive in and the more humble we are, the more learning and knowledge we can retrieve from those masterpieces. The more details and likenesses we realize and transfer to our practice, the more progress we will make. The saying "If you start mimicking other artists, that's when you lose your own identity" does not apply in learning Chinese calligraphy and painting at the early stages. In fact, the better we can mimic models and masterpieces of Chinese calligraphy, the higher artistic levels we can reach. Besides mimicking the shape, structure, and size of each character in tiny, tiny details, we also pay attention to start, connection, turning, closing, shading, and even overtone of connection between several characters. Those nuances are the decisive factors that determine the level of an artist and also motivate beginners to continue practicing.
![]()
A
painting album and Model Book (left), three sheets of rubbings of Bronze Inscription and a thin
paperweight (top),
and three sheets of
emulation practice (center and bottom). The brushes are placed on a bamboo roll.
Learning how to hold the brush ( 執筆 ) correctly is as important as choosing a good brush. Just as a swordsman needs to learn a good way to hold his weapon, students of Chinese calligraphy will need a good way to hold the brush to guarantee their success in the art.
The following are some inappropriate ways to hold a Chinese calligraphy brush for beginners for writing Kaishu in certain sizes. While there are no absolute rules in arts, experienced calligraphers may have different or contrary views. Like a violin player or a swordsman, the methods of holding a brush play undeniable roles in doing beautiful and good Chinese calligraphy. Each of the five fingers has supporting and contradicting forces with each other during brush motions and must be coordinated to generate good writing results.
Always try to keep the brush and brush hair as straight and vertical as possible. This is the most important principle, foundation, and theory in Chinese calligraphy! It’s different from painting or the Western way of holding a pen. Never ever bend the brush and the hairs too much. You may rotate the brush when necessary with your fingertips during writing a stroke when necessary (some people do this with knuckles). Rotating the brush tip ( 轉鋒 ) should be done sparingly. (Serious beginners may refer to the Center Tip Theory 中鋒理論 in the "Principles" section for more detailed discussion.)
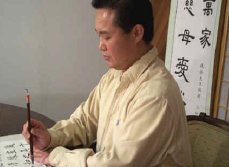
A
correct posture helps to make more progress in practicing Chinese calligraphy.
|
Basic requirements of a good posture may consist of the following: |
|
Some tilted postures of neck and shoulders are shown in http://www.houstoncul.org/eng_culexg/c023.htm and http://depts.washington.edu/chinaciv/callig/callmain.htm.
|
|
|
|
|
|
|
|
|
Keen observers may notice many tiny and coordinated movements between the fingers, palm, wrist, elbow, shoulder, brush handle and tip, and the paper. The video clips in this "Tutorial" show the fundamental points that need to be observed carefully during practice.
|
Basic preparation and requirements of a brush The brush needs to be neatly and carefully groomed or combed before practice. The hairs need to be combed evenly on a ink stone while the student is aware of how much ink is to be absorbed within the hairs -- not too wet or dry. Then make sure the hairs are well combed so that the tip of the hairs is in the center. This will help to smooth the brush motion. Otherwise, the hairs will be scattered and tilted and they won't follow our intended direction and pressure on the paper.
|
|
This video shows one of the correct ways to hold a brush. All five fingers function to stabilize a brush during writing. The angle between the wrist and palm need to be appropriate to keep the muscles relaxed. Otherwise, our control of a brush will be limited and inconvenient. (This is the Hanging Arm Technique with the wrist, elbow, and arm hanging in the air. It provides more freedom of motion for experienced calligraphers. It's not recommended for beginners. Beginners should start by resting their elbows on the desk.)
|
The Chinese term “chi bi 起筆 ” (start) literally means to begin writing a stroke. The term “so bi 收筆 ” (close) means to end writing a stroke. In writing characters each stroke involves “start” and “close." In Chinese calligraphy parlance, we call them hiding the brush tip ( 藏鋒 ) and wrapping the brush tip ( 裹鋒 ). The idea of hiding and wrapping the brush tip during writing each Chinese calligraphy stroke is different from pen writing and Western calligraphy and thus demands more time and concentration for execution of brush writing.
The
complete cycle for each stroke may contain start ( 起
), connecting ( 承
), turning ( 轉
), and
closing (合
).
If the strokes of a Chinese
character are regarded as the building blocks of each character, “start” and
“close” are indispensable for the structure, connection, and firmness of each
character.
![]()
Another
point to remember is to lift ( 提
) and press ( 按
) the brush with different forces. As
we are writing each character or even a single stroke, we do not use the same force
all the time. We first lift the brush up, then press it down to start.
Writing involves several alternate processes of lifting up and pressing down. When we use more force to press down, the strokes
appear to be thicker. When
we use
less force to lift up, the strokes become skinny.
In this way the strokes give each character varieties of changes, nuances,
rhythms, and philosophical and esthetical meanings.
|
|
|
This video shows the slanted and tilted way of holding and operating a brush. This will severely violate many principles of Chinese calligraphy.
|
In order to simplify texts, only Kai and Li Styles will be demonstrated here in this "Tutorial.”
Each
Chinese character is consisted of strokes (
筆劃 ).
Each Chinese character also has component sidepiece called Head Section or Section
Header ( 部首
).
For more information, please refer to other Chinese language textbooks or visit “Online Chinese Lessons” in the
"Links”
section.
|
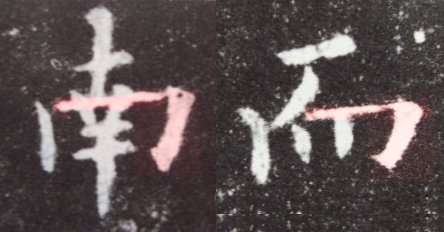
Golden Rule 1: Start with the upper part of a character, then move downward.
Golden Rule 2: Start with the left part of a character, then move to the right.
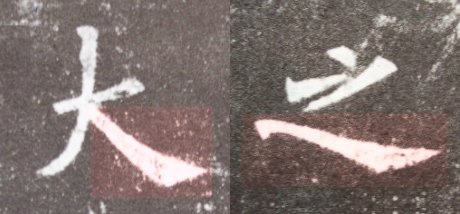
Golden Rule 3: Horizontal brushstrokes precede vertical brushstrokes.
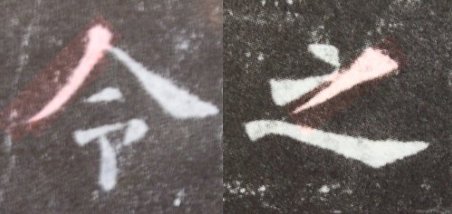
Golden Rule 4: Diagonal brushstrokes to the left precede diagonal brushstrokes to the right.
Golden Rule 5: Finish everything inside the box or wrap before closing with the last stroke. (The Box Rule)
|
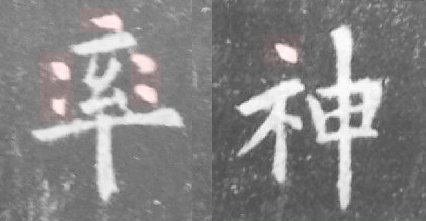
Typically, the stroke sequence ( 筆劃順序 ) of a character starts from left to right and top to bottom. The sequence is important to write a character as well as to create its beautiful shape and structure. Without understanding the sequence of strokes, when we are emulating (practicing) we are just copycatting a shape of a picture rather than a character. When we build a 10 stories high building, we cannot start from the 10th, or 5th floor. We must start from the foundation. Likewise, we cannot write a Chinese character without knowing the proper sequence of strokes. We cannot start from the bottom stroke and then finish with the upper stroke.
|
The
Eight basic strokes and their names in Kai Shu are:
1.
點
2.橫
3.豎
4.鉤
5.提
6.撇
7.短撇
8.捺
8.捺
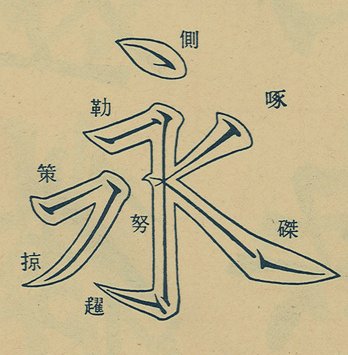
永 means forever or eternity. This character contains most of the basic strokes we need to know in calligraphy; it does not contain all of the different Chinese calligraphy strokes in Kai Shu. It has been widely used by many calligraphers to practice the eight basic strokes.
永 (Yong) "forever" or "eternity" in semi-cursive style
(Please note in the videos I usually demonstrated Duan Pe before Pe. This is because in calligraphy writing a short stroke is easier than a long stroke for beginners.) Video: Eight basic strokes in Yen’s Kai Style Video: Eight basic strokes in Yen’s Kai
Style Video: Eight basic strokes in Yen’s Kai Style
Video: Eight basic strokes in Oh-Yang’s Kai Style Video: Eight basic strokes in Oh-Yang’s Kai Style (part 2) Video:
Eight basic strokes in Oh-Yang’s Kai Style (together)
|
|
|
|
|
點
Dot
"Dian" |
|
|
豎彎鉤
Vertical
& Cursive Hook |
|
|
橫
Horizontal
"Hon" |
|
|
豎
Vertical
"Su" |
|
|
斜鉤
Slant
Hook |
|
|
橫折鉤
Bent
Hook |
|
|
撇
Aside or Left Falling |
|
|
捺
Right
Falling "Na" |
|
|
The sequence of strokes in each character is important in Chinese calligraphy. The stroke sequence creates a solid structure for each Kai character. Eight basic rules are listed in the video.
|
|
1.
Top before bottom |
|
|
2.
Left before right |
|
|
3.
Left vertical stroke before top horizontal stroke |
|
|
4.
Bottom horizontal stroke last |
|
|
5.
Center stroke before wings |
|
|
6. Horizontal stroke before intersecting vertical stroke |
|
|
7.
Left-falling strokes before right-falling stroke |
|
|
8.
Minor stroke last |
|
Congratulations! You have just learned how to start Chinese calligraphy on your own. The next step is to find someone who knows the Chinese language to give you some comments. Keep on good work if you are receiving compliments. Don’t be disappointed if they are not giving positive comments or they are not artistic enough to give you good opinions. Be humble and learn to take comments of any kinds.
“Repetitions make perfect. Practice makes perfect.”
Remember the “Model Books (Character Models)” adapted from the ancient masterpieces are always the best lifetime teachers (even for experienced calligraphers.) Repeat and repeat as we are heading for more progress and perfection. Chinese calligraphy is a very thoughtful, detailed, and inspiring art. The strokes should never be done lightly without enough understanding and planning. There are no such things as "The Simple Art of Chinese Calligraphy" or "Complete Guide to Chinese Calligraphy," otherwise it will not be a high art of China. The basics in this Tutorial or the contents of this website are by no means a complete manual of learning Chinese calligraphy.
The fastest way to be good at Chinese calligraphy is to expect no fast results. It usually takes an average Chinese kid a few months or even years to make smooth strokes. Observation, understanding, mental focus, planning, and steady hand execution and coordination are always indispensable, just to name a few.
|
The
above points are commonly known in Asian countries where Chinese brush
calligraphy is part of the education from grade school to high school.
These points are often neglected in
countries outside Asia. Japanese even treat brush calligraphy as
ceremonies or rituals as they pay more respect to the calligraphy art
they learned from China during the Tang Dynasty. |
The following short articles may be reviewed before proceeding to the Principles for more understanding of the basics.
"A Word A Day" ( 每日一字 ) is a popular program to learn Chinese characters in Asian countries.
icon.jpg)